 LeCoqRoti
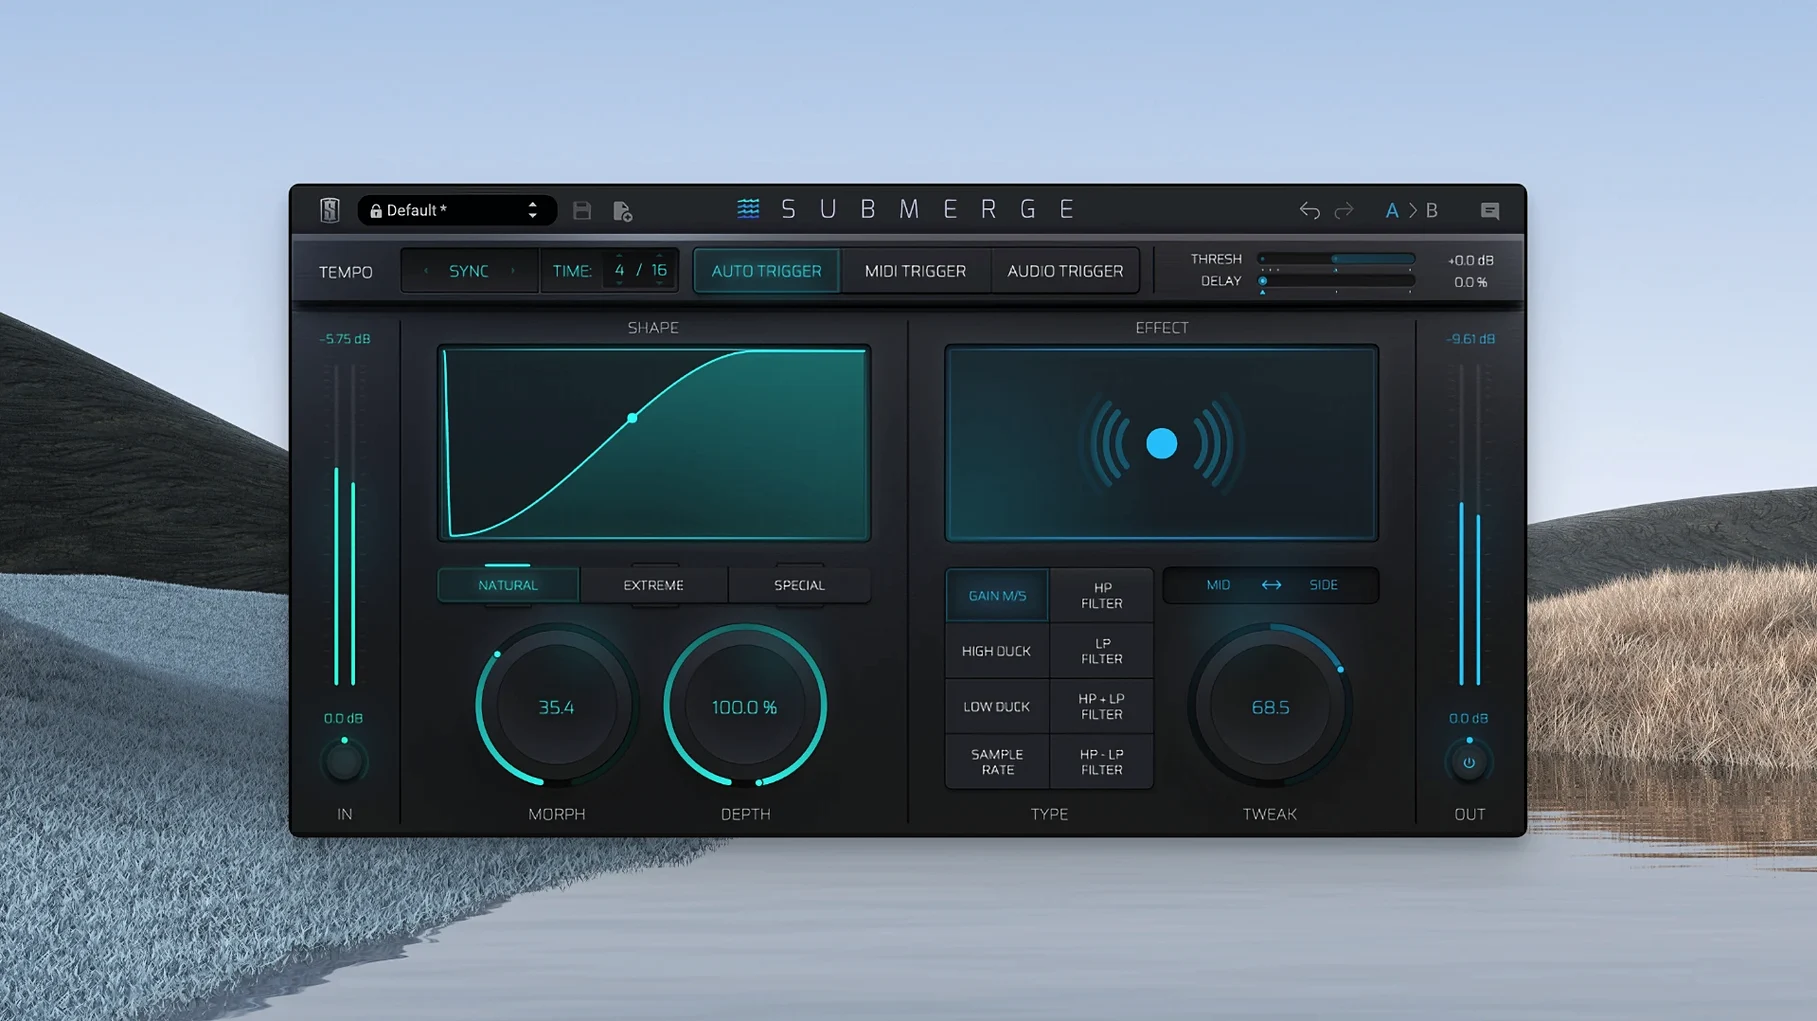
Setting up a traditional sidechain compressor means routing buses, assigning sends, and managing latency — a tedious chain that interrupts the flow of a mix. Submerge strips that process down to a single insert.
Trigger: three ways to drive the duck
The plug-in reads an external audio signal, syncs to the DAW project tempo, or responds to incoming MIDI notes. This flexibility lets you choose between a live kick-drum feed and a programmed pulse without touching your routing matrix.
Curve: natural, extreme, or hand-drawn
The custom curve mode opens a breakpoint editor where you draw the exact attenuation shape. Threshold, Speed, Morph, Depth, and Tweak controls then shift that shape in real time, so a subtle pad dip and an aggressive pump share the same starting curve.
Texture: eight effects built into the duck
Beyond volume shaping, Submerge layers high-pass and low-pass filtering alongside sample-rate reduction. The ducking envelope itself becomes a creative tool: you can push a bassline into lo-fi grit only while the kick hits, then let it bloom back to full fidelity.
Hidden gestures: a few details that slip past the eye
The interface keeps most of its intelligence on the surface, but a couple of modifiers change behaviour in useful ways. Holding Shift while adjusting the curve inverts the entire envelope, flipping ducking into a push effect — the signal rises instead of dipping, which turns a standard kick-pump into a swelling pulse that lifts a pad or a vocal phrase. A second touch: double-clicking any knob resets it to its default value, saving the small annoyance of recalling where Depth or Morph sat before an experiment wandered off course.
The Mid/Side toggle, tucked beside the main display, deserves more attention than it usually receives. When engaged, Submerge applies the envelope only to the side channel while leaving the centre untouched — or vice versa. A kick drum sitting in the middle can push a wide reverb tail outward on every hit, leaving the dry vocal perfectly stable. The effect is spatial ducking, and it changes how a mix breathes across the stereo field rather than simply up and down in volume.
A task from scratch: ducking a reverb throw on a vocal
Consider a dense chorus where a long plate reverb clouds the lead vocal. The traditional fix — automating the reverb return or sidechaining it to the dry vocal — involves extra routing and a compressor with fast attack and release times. Submerge handles it on the reverb channel alone.
- Insert Submerge on the reverb aux track, after the reverb plug-in.
- Set the trigger mode to Audio and select the dry vocal bus as the external input.
- Choose the Natural curve to begin with — its shape mimics a smooth gain reduction that feels closer to a fader ride than a hard pump.
- Lower the Threshold until the reverb drops by 4–6 dB with every vocal phrase. The display shows the envelope moving in time with the words.
- Increase Speed slightly so the ducking recovers just before the next syllable lands; too fast sounds choppy, too slow leaves the tail muddy.
- Engage the High-Pass effect and set its frequency to around 400 Hz. The reverb now ducks and loses low-end weight simultaneously, cleaning the centre image without thinning the voice itself.
The result is a reverb that steps aside when the vocal speaks and returns between phrases — no external sidechain bus, no compressor attack curves to chase.
A working session, moment by moment
You open a project that already has a rough balance: drums, bass, a stereo synth pad, and a lead vocal. The kick and bass are competing in the low end, and the pad feels static. You insert Submerge on the bass channel first.
The DAW is playing. You set the trigger to MIDI because the kick pattern already exists as a MIDI clip on a separate track; routing that note data to Submerge takes one menu selection. The plug-in begins responding instantly — no audio sidechain, no pre-fader send. You pull the Depth knob to about 30% and watch the bass duck in clean, musical dips. A small nudge of the Morph control softens the curve’s knee, making the transition from dipped to full level almost imperceptible. The kick now cuts through, but the bass still feels present.
On the pad track, you try something different. Trigger mode switches to Auto, synced to quarter notes at the project tempo. The Extreme curve gives an aggressive pump reminiscent of a French touch sidechain, and engaging the Sample-Rate Reduction effect, dialled to 8 bits, adds a grainy texture that only appears during the duck. The pad breathes in a rhythmic, degraded pulse. You automate the effect bypass for the verse so the grit enters only in the chorus.
By the end of twenty minutes, three instances of Submerge are running: one on bass, one on the pad, one on a delay throw. None required a single aux send or a compressor sidechain input. The session stays focused on musical decisions rather than technical plumbing.
First days: settling in without friction
A new plug-in tends to either vanish into a folder or dominate every session for a week. A few habits help it find a steady place.
Spend an afternoon auditioning the eight effects across different material. The Low-Pass filter inside the ducking envelope, for instance, sounds entirely different on a bright hi-hat pattern than on a full-range synth pad. Learning those differences early prevents reaching for the same two settings out of habit.
Save a handful of custom curves in the first sessions. The breakpoint editor is quick to use, and a curve shaped for a slow, breathing pad duck will rarely suit a fast stutter edit. Having three or four named presets — perhaps “vocal reverb dip,” “kick push,” and “quarter-note pump” — shortens the setup time on subsequent mixes.
When working with audio trigger mode, route a percussion element that hits cleanly and predictably. A shaker or a closed hi-hat often produces a more consistent envelope than a full drum loop, where transients vary in amplitude and can cause uneven ducking. The same principle applies to MIDI trigger: a short, high-velocity note works better than a long, low-velocity one.
Experiment with the Tweak knob early. It shifts the timing relationship between the trigger and the envelope onset, which can push a duck slightly ahead of the beat or drag it behind. A negative value tightens the response for an EDM kick; a small positive offset lets a snare transient through before the duck engages, preserving its attack.


Correspondence 0
Take a chair or join the table to send a letter.
No correspondence on this note yet. Letters are read before they appear.