 LeCoqRoti
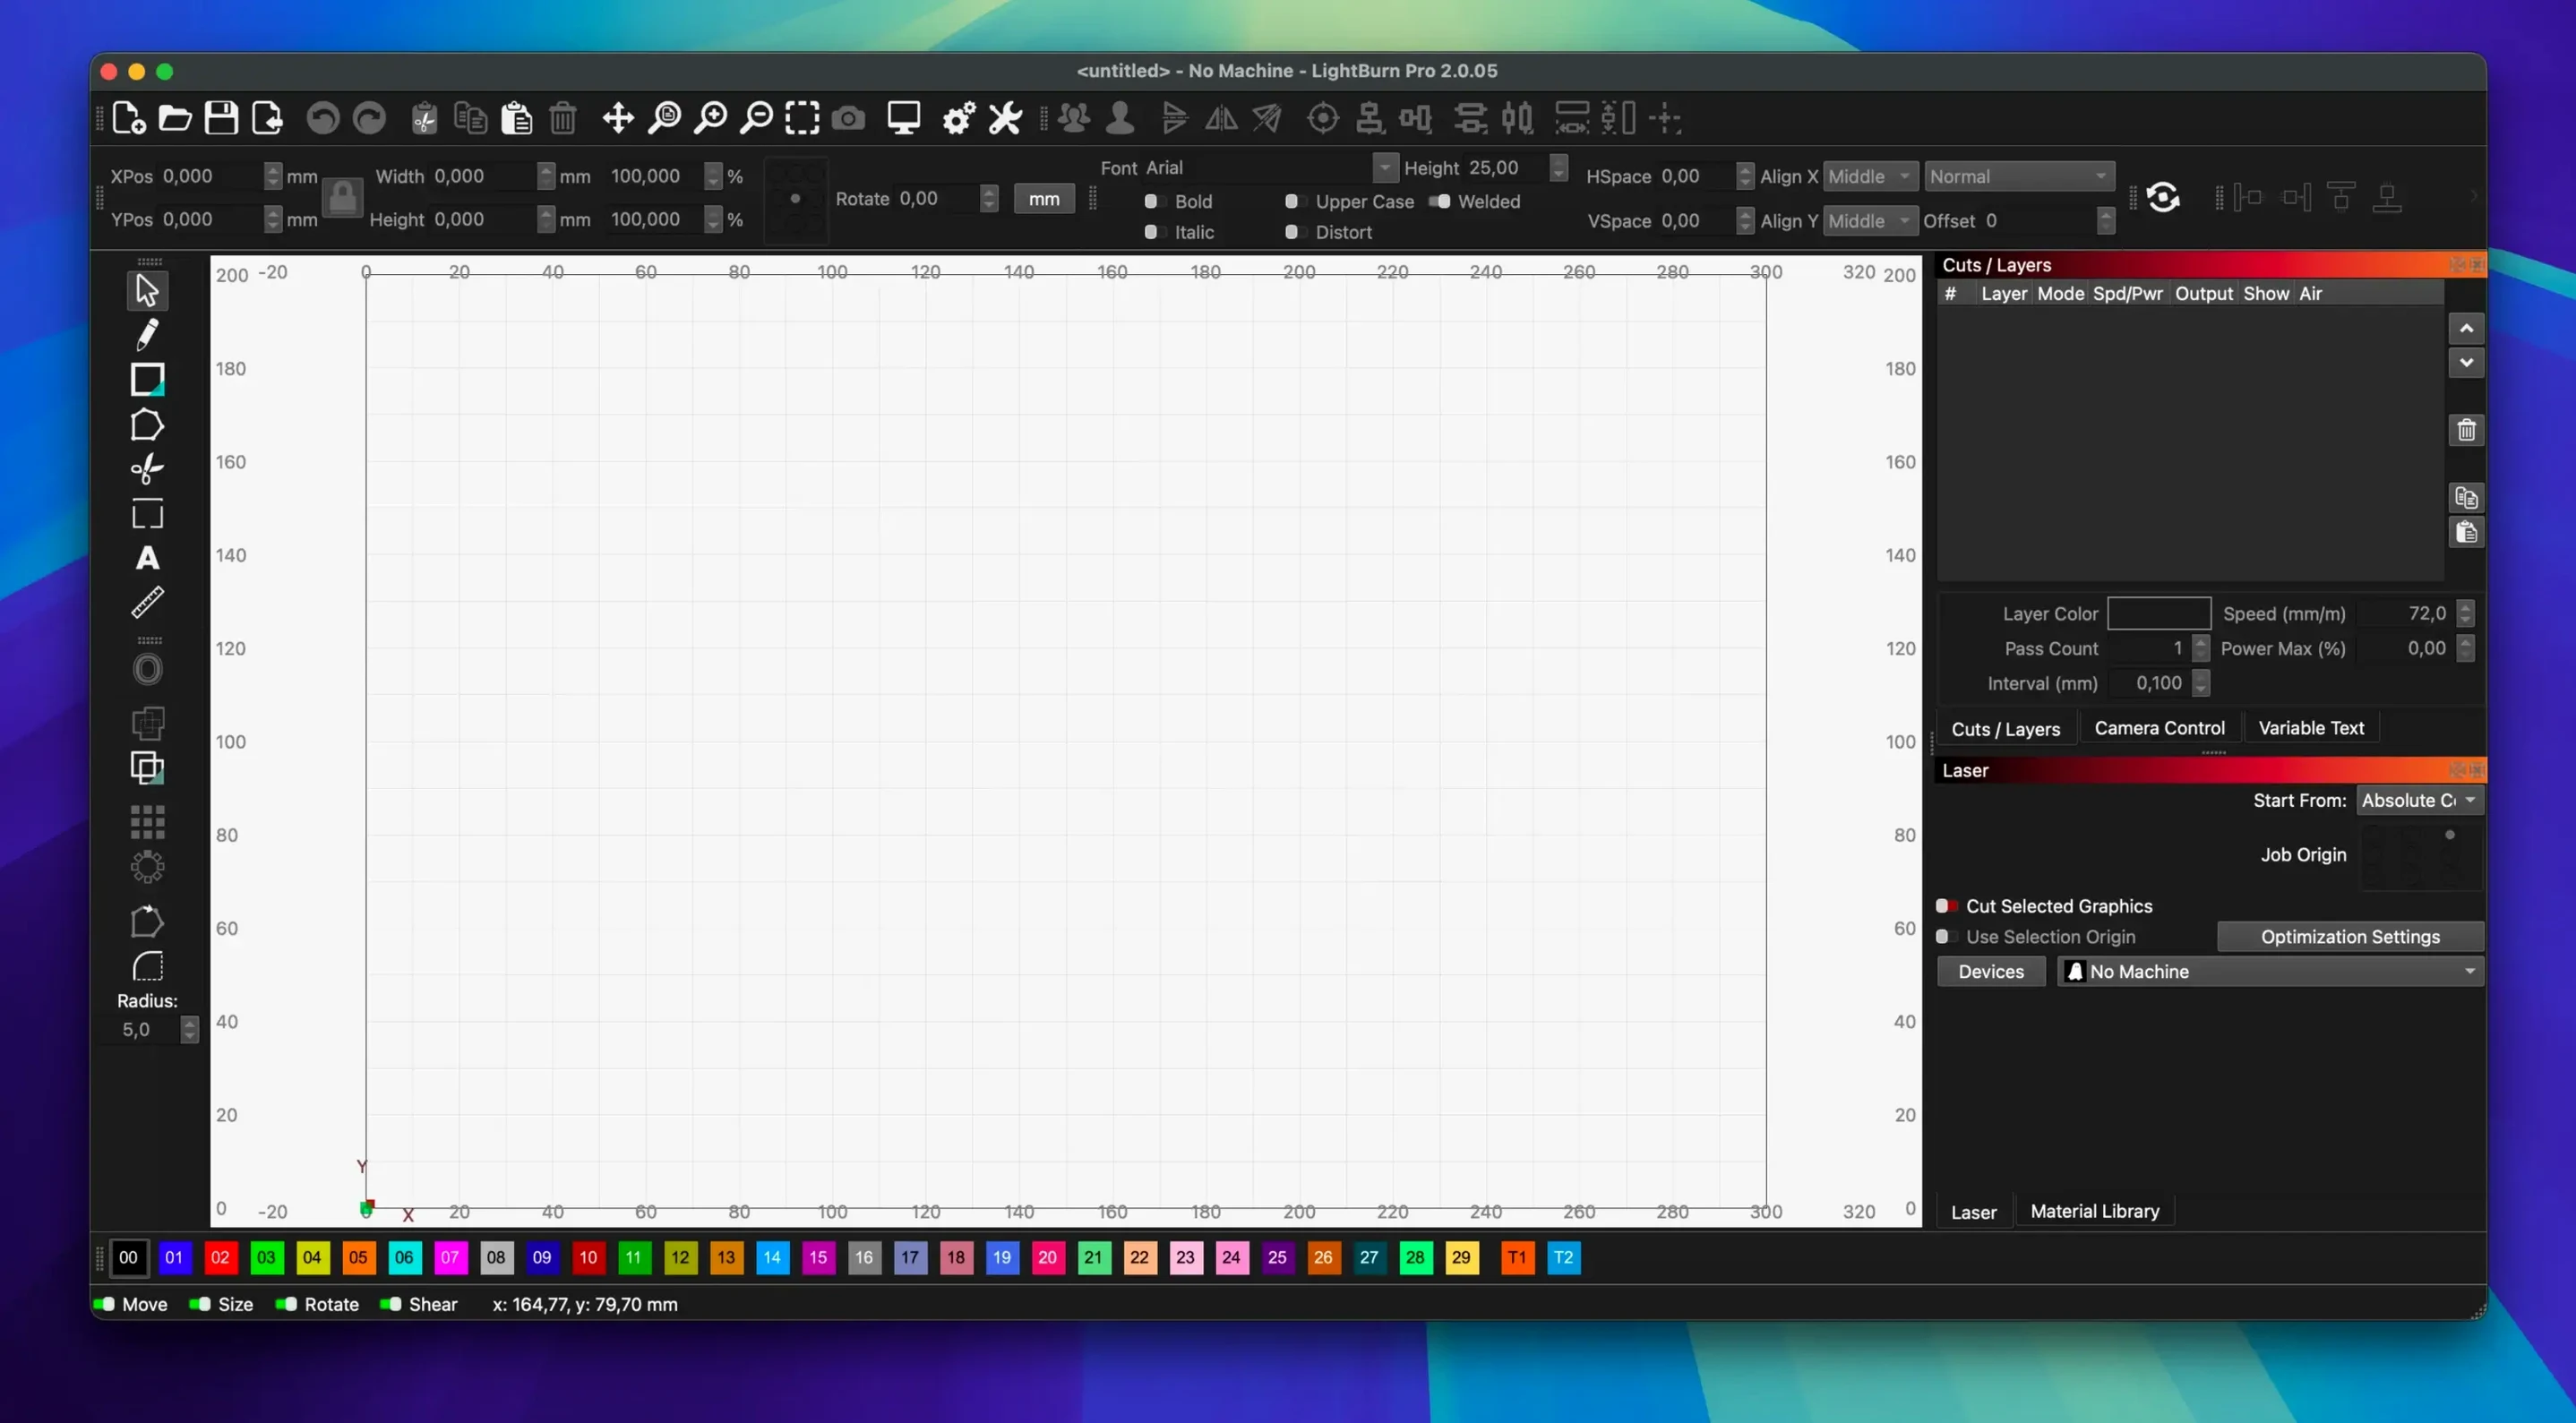
Adobe Illustrator gives you a canvas; LightBurn gives you a canvas that cuts, engraves, and marks. It occupies the same mental space as a vector design tool, yet its purpose is distinctly physical. The interface feels familiar — pens, shapes, a layers panel — but the decisions you make are translated into power levels, pass counts, and cut orders.
1. Design: built-in vector editor
You begin with the drawing tools. The editor handles shapes and text natively, with boolean operations, offset paths, and weld tools to combine or carve away forms. Imports arrive quietly: AI, SVG, DXF, PDF, and raster formats like PNG or JPG all land on the artboard without conversion software.
2. Tune: the material library
Here the work shifts from screen to substance. A material library stores preset speed and power settings for plywood, acrylic, leather and others. You adjust brightness, contrast, and dithering for raster engravings, then assign cut order and multiple passes in the layer panel.
3. Send: direct machine control
Sending the job requires no intermediary application. The software talks to the laser directly, streaming data and offering real-time jogging control. What you see in the editor is what the laser receives.
A few quiet adjustments in the first days make a substantial difference to the experience. The interface is well laid out, but it rewards a deliberate approach. Begin by setting your default units under Edit → Settings — millimetres or inches, whichever matches your machine and your thinking. With that done, open the Laser window and check your device origin; LightBurn remembers the last position, and a mismatch here can send the head to an unexpected corner on the first job of the day.
Next, spend an hour with the material library. The presets are sensible starting points, not gospel. Cut a small test grid on a scrap of the plywood or acrylic you use most often, note the power and speed that gave the cleanest edge, and save that as your own entry. Naming it honestly — “3mm birch ply, 60W” — will save you from squinting at handwritten notes six weeks later. And if you work with a rotary attachment, enable it once in the Rotary menu and run a quick dry pass with the laser off; the shape of a cylinder changes the focal point, and a minute of verification beats a ruined tumbler.
A small sign-maker’s afternoon
Consider someone running a modest business from a garden workshop, producing custom house signs in slate and oak. A client has asked for a circular welcome plaque with a family name in a serif face, a thin decorative border, and a small engraved illustration of a wren. The sign-maker opens LightBurn and drags the customer’s supplied SVG of the bird onto the artboard. The paths are messy — a half-dozen ungrouped shapes that should be silhouettes. Instead of redrawing, they select all, run a boolean union, and apply a small offset to soften the outline. The text is set directly in the editor; the font preview shows what the laser will trace, not what a printer would lay down. Five minutes later the layout is locked, and the job is divided into two layers: one for the engraved bird at higher speed, another for the cut border and keyhole slot at lower speed with two passes. The material library entry for “Welsh slate, 50W” is loaded, the frame is homed, and the job streams to the controller. Within the hour the sign is wrapped in tissue paper, ready for collection.
Four clicks to first burn: connecting, framing, and the exhaust fan whine
You open LightBurn to a blank workspace at nine in the morning. The first action is connection: clicking the Laser tab, selecting the COM port that chirps recognition, and hearing the faint whine of the exhaust fan as the machine wakes. A rectangle is drawn to match the bed size — a habit that gives you a visual boundary and a fast way to jog the head around the perimeter later.
Step two is placement. You import a DXF of a geometric trivet design you sketched yesterday in another program. It drops onto the artboard at the last-used coordinates; you drag it to the centre, then use the alignment tools to distribute the five interlocking hexagons evenly. A quick right-click opens the Shape Properties dialogue, where you set the cut line to a pale blue so it stands apart from the engraving layer beneath.
Step three is tuning. The engraving layer holds a stippled texture pattern you created from a greyscale PNG. In the Cuts / Layers panel you assign it a dithering mode — Jarvis, for a softer grain — and drop the power to 22% while raising the speed. The cut layer is set to 70% power at 18 mm/s with a single pass. You tick Optimise cut path to reduce travel time, then preview the animation: the virtual head traces every move in fast-forward, revealing a stray node that would have sent the laser darting across open space. You delete it.
Step four is the send. The Start button in the laser window turns green. You jog the head to the front-left corner of the material, set the origin, and frame the job — a rectangle of red diode light skating around the edges of the plywood sheet. Satisfied, you press Start and watch the first few seconds of the engraving pass: the beam makes its quiet, focused noise, a thread of smoke curls into the extraction hose, and the pattern begins to emerge line by line. You stay for the first layer, then step back to tidy the workbench while the machine completes the cut.
Three alternatives: how LightBurn sits among peers
For Mac users there are a handful of applications that occupy the same niche, each with a distinct character. LightBurn is unusual in combining design, layout, and machine control in a single package; most alternatives split these functions or lean harder on one of them.
LaserGRBL is a lightweight, open-source controller that runs on macOS through a compatibility layer. It handles raster engraving well and can stream G-code to many GRBL-based machines. The editing side is limited to basic image adjustments — rotation, scaling, a few filters — and there is no vector drawing workspace of its own. Users who already create designs in Illustrator or Affinity Designer and want a straightforward sender often find it sufficient. But the absence of a native Mac build, combined with the lack of a material library or boolean tools, means the workflow remains split across multiple applications.
LightBurn absorbs both halves of that workflow. The built-in editor is not a replacement for a full illustration suite, but it handles the common operations — node editing, welding, offset paths, text on a curve — without leaving the environment. The direct machine control is deeper, too: real-time jogging, rotary axis support, camera alignment, and a preview that simulates the job path before a single pulse of the laser fires. For someone running a single machine and wanting to move from idea to object in one window, the consolidation is the point.
RDWorks is the manufacturer-supplied software bundled with many Ruida controllers. It runs on Windows, not natively on macOS; Mac users must employ a virtual machine or dual-boot setup. The interface is functional but feels older, with small dialogue boxes and an editing toolset that covers basics like shapes, text, and array duplication. It communicates reliably with Ruida hardware and supports the full parameter set of those controllers — pass counts, power curves, corner acceleration — but the design experience is cramped compared to LightBurn’s canvas. Users who need a direct link to Ruida firmware without translation layers often begin here, though many eventually migrate once they encounter the editing ceiling.
Each of these tools has a reason to exist. The choice turns on whether you prefer to separate design and control, or bring them together under one roof.
In short: a single workspace that moves from sketch to finished object without a single export.



Correspondence 0
Take a chair or join the table to send a letter.
No correspondence on this note yet. Letters are read before they appear.